Announcement

Collapse
No announcement yet.

Kold Kutter ice cleats on supertracks

Collapse
X
 
  • Filter
  • Time
  • Show
Clear All
new posts

  • Kold Kutter ice cleats on supertracks

    Ok, as I promised here : http://www.6x6world.com/forums/argo-...-question.html

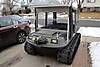
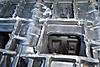
    Install pics. These things are sharp and very hard. And by the looks of my driveway make great contact. I have not had them on ice yet - soon.

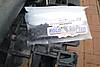
    First pic shows the tools used. 5/64 bit and stop for pilot. I tried a few without the pilot but found that the grip of the screws seems better with the pilot hole. All screws were final turned to align perpendicular to the line of travel to hopefully reduce steering load. Can't hardly see they are there. Two on each section.

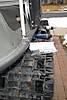
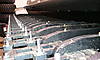
    Second pic, close up of the install. That extra hole there is to show what the pilot hole looked like before the screws are install. Yeah, that's why it's there.

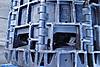
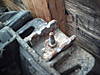
    #3 is to show... I don't know. I just liked it.


    How do you get the cool thumbnail bar?

  • #2
    I added this as a reply for the chronological record.

    Yesterday I spent some time on a ride in the mountains of Wyoming. It was the first time I had ever been with another AATV and given the terrain obstacles around I took the opportunity to test the machine. Up until now the worst my tracks had seen was some packed snowmobile trails and the ice/shallow snow one finds icefishing.

    The cleats work great on ice and as I've mentioned in other post they will tear up your driveway. In my adventure yesterday I got the chance to bury the tracks in deep snow and claw at the rocks underneath to try and work my way up-slope. Granted, some slopes chosen for the testing were ridiculous; when I was done spinning my tracks I would back up and drive around them. I would say that the cleats must grab well as there is ample evidence that the cleats stayed.


    As you can see, they mush the plastic over and pull out. This is the starboard side and I bet I lost half of my cleats like this although a few were sheared along with the plastic they were in:

    I've removed them since I have started finding them in the driveway and I don't want to be digging one out of a tire.

    Comment


    • #3
      Hi John,

      Great to meet you both and Dan also. Had a blast playing in the snow with you guys. Im on our way home now, but when I get back to my desk ill post some pictures from our ride on the other thread.

      Just read your post about breaking the studs out of your tracks, so it got me thinking about mine. We were climbing and spinning on some really rocky slopes and that probably where damage could have occurred. here is a picture of how I installed the 5/8" gold diggers in my tracks.


      When I get back in the shop im interested to inspect for damage and see if I lost a few also.

      Thanks for taking the time to come up and hang out with us. Really enjoyed the time with you guys.

      Tim

      Comment


      • #4
        Thanks for the update. To bad they bent over like that though.

        In your older post you said "How do you get the cool thumbnail bar?" Not sure exactly if your talking about the manage attachment option or not. But its like this. Here are some random pictures to show you. If thats what your talking about if you are using the advance reply(not quick reply) its down a tad in blue. If you click on that you can add files to attach.
        Attached Files

        Comment


        • #5
          Originally posted by Obsessed View Post
          Hi John,

          Great to meet you both and Dan also. Had a blast playing in the snow with you guys. Im on our way home now, but when I get back to my desk ill post some pictures from our ride on the other thread.

          Just read your post about breaking the studs out of your tracks, so it got me thinking about mine. We were climbing and spinning on some really rocky slopes and that probably where damage could have occurred. here is a picture of how I installed the 5/8" gold diggers in my tracks.


          When I get back in the shop im interested to inspect for damage and see if I lost a few also.

          Thanks for taking the time to come up and hang out with us. Really enjoyed the time with you guys.

          Tim
          Hey Tim,
          Just curious what are the bolts for extensions? Do the threads get damaged, or I mean Im assuming they do. Are they threaded rod or what do you do to take them off? Cool track though!

          Comment


          • #6


            MmmMm, Bacon!!

            sorry..had to. LOL
            I have officially caught the 6-wheel-sickness!!

            "If your gonna be dumb, you better be Tough!"

            "I have done so much, with so little, for so long, that I'm now capable of doing practically anything with virtually nothing...."

            BUY AMERICAN..or...BYE AMERICA!!!

            Comment


            • #7
              Originally posted by LarryW View Post
              Hey Tim,
              Just curious what are the bolts for extensions? Do the threads get damaged, or I mean Im assuming they do. Are they threaded rod or what do you do to take them off? Cool track though!
              hi Larry...the bolts are just another attempt at a simple, low cost, ice stud...after getting some feedback on our previous attempt at using standard 1/4" by 2" carriage bolts for a little more bite, we got the idea that they were not strong enough to prevent bending and breaking...so this track was retrofitted with common 5/16" by 2" bolts in the inner location and also inexpensive gold digger ice screws, and then tested on rocks, stumps, and whatever else we could dig up....i lost one bolt on the connector link in the first few minutes, but because we were still in snow around our cabin, i believe that it was due to my mistake and the nut never got tightened down when assembled...all the others seemed to stand up to abuse pretty well, im anxious to look it over a little closer when we get back to the shop....as for taking them off or damage to the threads they are just a grade 2 bolt, so taking them off shouldnt be much of a challenge..

              tim

              Comment


              • #8
                Originally posted by LarryW View Post
                Thanks for the update. To bad they bent over like that though.

                In your older post you said "How do you get the cool thumbnail bar?" Not sure exactly if your talking about the manage attachment option or not. But its like this. Here are some random pictures to show you. If thats what your talking about if you are using the advance reply(not quick reply) its down a tad in blue. If you click on that you can add files to attach.
                Well, yes, like that. Advanced eh, I don't usually go there except for emoticons.

                Ok, I usually upload my pics to the gallery and grab the link text at the bottom. Looking at this (uh, now) it looks like you use pics that are uploaded to a different location. Is that right? I see I have a choice of "Home" and "no assets" (this tool is spooky, how did it know that?) Is there a way to grab gallery pics?

                Comment


                • #9
                  JohnF,
                  As far as I know there is no way to do the thumbnails with the gallery photos like they are with the attachments. When you open the attachments there is a link in the upper right that says add files. You just add them like you would for the gallery by finding your picture folder on your computer. Once its in there it stays unless you delete it. And yes its like another location to store the picts but I dont think there is a way for members to search through them like in the gallery. So that is a drawback. As far as I know that is correct but I could be wrong somewhere there, lol.

                  Tim,
                  Ah I see now. They sure look like they would bite something.

                  mustangwagz
                  Those rascals got out of the barn, lol. They are not suppose to be out because of bio security reasons too. Dont want them bringing something in and getting 4000 pigs sick. Someone screwed up too because they have to go through a gate and then the door to get out.

                  Comment


                  • #10
                    Hey John,for years I used super,s what I did to improve traction on slippery slopes was to install the factory ice cleats and then on every other one I bolted them down using Woodys Gold digger 5/16 carbide tipped snowmobile studs in place of the factory supplied bolts,they have been in the tracks for years and had very few failures,and I plowed with them I found them to be very durable and with installing them into the factory steel ice cleats they were very stable and did not damage the track,granted they can only be used on the outside but helped on icy sections.I will post up a pic when I find out where the darn camera is LOL.

                    Comment


                    • #11
                      I am going to need to replace the functionality I had with something. NCT, pics would be great. I am looking at the factory cleat and it turns out that there are two versions. "Old style" which looks like it has one biting edge and two bolts and a style that looks like a chunk of channel with two ice edges and one bolt. The old style can be had for considerably cheaper. Anyone have experience with both styles?

                      I can't tell from the pics of the old style whether they clear the plastic in the tracks??? A pic would be cool.

                      Comment


                      • #12
                        Originally posted by JohnF View Post
                        I am going to need to replace the functionality I had with something. NCT, pics would be great. I am looking at the factory cleat and it turns out that there are two versions. "Old style" which looks like it has one biting edge and two bolts and a style that looks like a chunk of channel with two ice edges and one bolt. The old style can be had for considerably cheaper. Anyone have experience with both styles?

                        I can't tell from the pics of the old style whether they clear the plastic in the tracks??? A pic would be cool.
                        John the picture such as it is(Iam a bad photog)I have posted to my gallery as Iam so computer unsavy I still cant post to a thread no matter what I do,so those cleats and studs have been in those tracks for years and the cleats themselves are wore badly they did stick up further when new and are held in by one bolt.N.C.T

                        Comment


                        • #13
                          Hey thanks! Here's the thumbnail:

                          They look pretty good for wore badly.

                          Anybody with a comment about the "old style" cleats? I can get a set for $40 on sale right now.

                          Comment


                          • #14
                            Originally posted by Obsessed View Post
                            Hi John,

                            Great to meet you both and Dan also. Had a blast playing in the snow with you guys. Im on our way home now, but when I get back to my desk ill post some pictures from our ride on the other thread.

                            Just read your post about breaking the studs out of your tracks, so it got me thinking about mine. We were climbing and spinning on some really rocky slopes and that probably where damage could have occurred. here is a picture of how I installed the 5/8" gold diggers in my tracks.


                            When I get back in the shop im interested to inspect for damage and see if I lost a few also.

                            Thanks for taking the time to come up and hang out with us. Really enjoyed the time with you guys.

                            Tim
                            Hi Tim
                            Couple questions on this pic you posted:
                            All the long bolts are are in one row, and all the short are in a row. Do you think there would be an advantage to staggering those bolts........every second bolt would be long in both rows?
                            The way the extension plates are "layered", it looks like the extensions could be bolted together the other way, which would put a leading edge on top to bite into the snow. The way it looks in the pic, there is more of a slight ramp laying into the snow.
                            I could be wrong here, but it looks like the current configuration would have better traction in reverse than forward. Am I making any sence here? Looks like the pic is taken from the back of the machine.

                            Oh ya, your email inbox is full

                            RD

                            Comment


                            • #15
                              Originally posted by Rock Doctor View Post
                              Hi Tim
                              Couple questions on this pic you posted:
                              All the long bolts are are in one row, and all the short are in a row. Do you think there would be an advantage to staggering those bolts........every second bolt would be long in both rows?
                              The way the extension plates are "layered", it looks like the extensions could be bolted together the other way, which would put a leading edge on top to bite into the snow. The way it looks in the pic, there is more of a slight ramp laying into the snow.
                              I could be wrong here, but it looks like the current configuration would have better traction in reverse than forward. Am I making any sence here? Looks like the pic is taken from the back of the machine.

                              Oh ya, your email inbox is full

                              RD

                              Hi RD...just got home and getting ready to unpack, but wanted to share some thoughts with you...

                              i think if you look closer at the picture of the 21" wide track you will see the rear snow flap and the name plate above it (let me know if i might be miss understanding your question)...the picture is taken from the front...your thoughts are excellent and identical to mine regarding the direction of the layered track extentions...i did in fact install the tracks in the direction you are suggesting, because that was my first thoughts also...now i am not so sure...the benifit of having them mounted that way is obvious, but it tends to lean the bolts (studs) backwards for less traction in forward (but possibly more stopping power on ice....I actually ment to install the tracks on the opposite side, for more lift (im guessing) in the snow and also a better attack angle of the stud on icy slopes (my more recent theory)...im not really convinced which direction would actually give the most traction on power snow as the flexable outside edge of the track has a bit of a "cheese grater" affect in either direction...i attempted to test forward and backward traction a little bit, but weight distribution is so different from front to back, im not convinced the results were trustworthy...perhaps a better test would be to lay an unmounted track out in the snow or on ice and try to drag it from either end...next trip out i plan to take a couple more pieces of tracks assembled in different ways and try the new "drag test"...honestly its really hard for me to take the time or focus on testing once i start playing, im not even good at taking any video (i wish David or Dan was out there riding with us...lol)...i really enjoy the pictures and videos afterwards to do a lot of my observations and research....i also took quite a bit of time studying the different styles of tracks that were on several of the newer snowcats out there and i am certain of several changes that probably need to be made to "up" snow performance a little bit...like John, i was also super impressed with Dan's 24" wide tracks and how well they were able to climb steep snow :-) not sure if that was from the extra width or the extra "bite" from the larger paddles...probably a bit of both, but either way Dan's machine is pretty awsome in the snow and really had the look of a high dollar snowcat

                              as for the bolt pattern...my first thought was to install the longer traction bolts closer to center for two reasons...first, i think that it is a more stable part of the track due to the flexability of the outer edge (by design) and probably gets more downward pressure from the tire...second, i wanted to be certain to have the traction closer to the center where it would be less likely to "snag" a hazard and possibly damage the outer edge of the track or try to roll a track off....I do think that you are correct and that a staggered pattern would improve "bite"...after seeing how easy the machine was still able to turn in all the different situations, im not so sure that you wouldnt be better off putting long bolts in all the holes...

                              im not sure if the gold digger ice screws or the bolts helped the most, but after the other guys left, we did help pull a snowmobile trailer out of the ditch and back up on an icy road, and i was very impressed with the traction we had on glare ice... seemed like a pretty good blend of traction and the ability to still skid steer

                              sorry about the email...will try to get back to work tomorrow and also get some pictures uploaded :-)

                              tim

                              Comment

                              Working...
                              X