My Hustler rebuild (with a few tasteful modifications/upgrades) :D

  1. Welcome to 6x6 World.

    You are currently viewing our boards as a guest which gives you limited access to view most discussions and access our other features. By joining our free community you will have access to post topics, communicate privately with other members (PM), respond to polls, upload content and access many other special features. Registration is fast, simple and absolutely free so please, join our community today!

    If you have any problems with the registration process or your account login, please contact us. Looking forward to seeing you in the forums and talking about AATVs!
+ Reply to Thread
Page 2 of 2 FirstFirst 1 2
Results 11 to 20 of 20

Thread: My Hustler rebuild (with a few tasteful modifications/upgrades) :D

  1. #11
    Join Date
    Oct 2007
    Location
    statesville, north carolina
    Posts
    2,604
    Quote Originally Posted by ARGOJIM View Post
    Sticks in the middle?
    It is a HUGE IMPROVEMENT on the hustler. In the stock location, if you have a left foot larger than a ladies 6, you have to put it to the right of the sticks and sit sideways. I centered mine and sit center unless I have a front seat passenger.
    A well regulated Militia, being necessary to the security of a free State, the right of the people to keep and bear Arms, shall not be infringed.

  2. #12
    Join Date
    May 2009
    Location
    NJ 08533
    Posts
    5,055
    Quote Originally Posted by racerone3 View Post
    It is a HUGE IMPROVEMENT on the hustler. In the stock location, if you have a left foot larger than a ladies 6, you have to put it to the right of the sticks and sit sideways. I centered mine and sit center unless I have a front seat passenger.
    But with buckets (2)? Or are we talking making some funky sticks that pull over right leg to center of driver?

  3. #13
    I relocated the seat frame back a couple of inches hoping to gain some more foot room. Once I get running, I'm going to try it this way for a little bit, but if its not comfortable, I'll definitely be relocating them to the middle

    Wedge, I was wanting to do something a bit different with the wheels and I was looking at I think stonewall's setup... where he knocked out all the wheel studs, and then redid the bolt pattern to a more common atv pattern. Good idea, but looked like quite a bit of work. So I went on a hunt to find something that would fit and these were literally the only thing I found... They are 10 x 6 with a 5/4.5 bolt pattern and they bolt up to our stock Hustlers perfect. 10 Inch 5 Bolt Gunmetal Inlay Aluminum Trailer Wheel On the positive side, they look good (IMO), are pretty cheap, and being 10" expands the tire choices a bit. On the negative side, they are very narrow and it limited my tire choices. Those are 25x11x10 Sedona Mud Rebels and once you get them on that 6" wheel, you couldn't get any closer to not being able to turn the wheels for lack of tub clearance on the front set. I should have gone smaller, but I'm going to go with it... they'll wear down eventually! I have no idea if they will mud trail or swim worth a damn, but for my normal purposes it should be fine. We really don't have much mud around here... for me its mostly dry ranch roads with an occasional dip in a lake. This hustler is a scrambler with a 28HP kohler 2 stroke anyway... more set up for speed than crawling.

  4. #14

    Split Shift Modification

    I'm going to add my version of the Hustler T20 split-shift to the pile. Here's what it looks like finished and a video of it shifting/moving (very loosely mocked up). Pros: simple, functional, uses existing infrastructure, and looks stockish. Cons: I have to relocate the parking brake somehow, and somewhat blocks underseat access from the front. The following posts will be the step by step process... may be a little tedious, but these sorts of 1, 2, 3 threads helped me when I was attacking this.


    VIDEO
    http://vid254.photobucket.com/albums...ps88211523.mp4

  5. #15

    Split Shift Part 1 (Front)

    Stock Configuration, Battery Tray and Parking Brake in Place.


    Removal of Battery Tray/Parking Brake. Basically just attack the welds with a cut off wheel and grinder, trying not to cut into the surrounding frame too much.


    Should look like this when you are done...


    Find a piece of bar steel (round would probably be better, but I was using parts on hand and as you will see this square bar had a end attachment that I incorporated into my design) that looks like it will thread through the existing shifter tube like so...


    If yours is like mine, the tube may be partially blocked by a messy factory weld, which you can hog out with a drill until your bar clears (not so much that you compromise the weld... just enough).


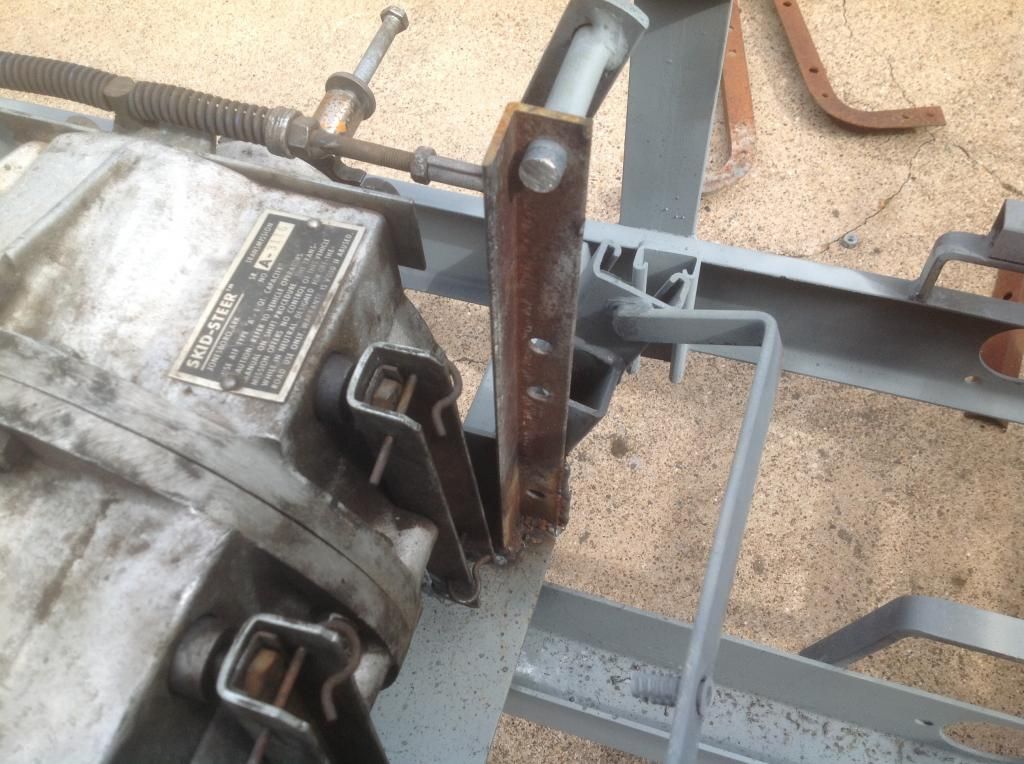
    From there you need to start figuring out how to support the other end of the steel bar. I chose a piece of angle iron that was tall enough so that I could drill my carrier hole to be level with that of the hole on the other end of the bar in the stock shifter (first pic). When mocking things up for this support bracket, be sure that the arm which will be attached to this end, is lined up straight with your rear shift linkage attach point, use the shift linkage from the driver side to mock up. (second and third pic)


    Next you are going to need a shifter. I found this in the scrap pile and decided it would work. You could just as easily do this without the bit on the end, by going directly to the bar with a piece of pipe, and then using a spacer to clear the tang on the stock shifter that keeps it from popping out of gear. Whatever you use, this will obviously have to be welded directly to the bar so that when you move the shifter the bar moves too.


    Affix the lever on the end of your bar, this will be the lever to which the linkage from front to back will ultimately attach. I happened to have this piece that was already made for the bar (that's why I used it), but you could just as easily weld a piece of flat bar steel of an appropriate size on the end... just need to drill a hole.


    From there you should make a spacer to run over your bar and between the outer support bracket and the new shifter. This will help prevent the assembly from shifting and help clean up the look. I used a piece of conduit cut down to size.


    The last picture is pretty complete, but there are still some things to do to the front assembly at this point. 1) Cut off any excess bar from other side of stock shifter assembly, I left enough room for a bronze washer (bearing) and then welding a hefty washer onto the end as a retainer (pic 1). Its all painted up in this picture, but you can see what I'm talking about. 2) Weld up or bolt your passenger side support bracket to the floor... I had an issue here. The floor sheet metal is not strong enough by itself to sustain the flexing of the shift movement. So I cut a piece of steel bar to fit between the two frames and then welded it in as a support (pic 2). 3) You also need to go ahead and weld the shifter to the bar it connects to if you haven't already. You can also sort of see this in (pic 2). Caution, when you make your welds you need to have everything as it would be for a successful shifting through the full range of positions that your transmission is going to require. The easy way to do this is just to match your new side's range of motion to the range of motion of your stock shifter and all of the linkages back to the transmission.


  6. #16
    Join Date
    Mar 2010
    Location
    Oconee County, SC
    Posts
    823
    While you have the frame out and the brain juices flowing.. Reinforce the T-20 mount. Hustlers are notorious for the T-20 to come loose at the worst possible time. There are several pictures of how members have reinforced their T-20s. Browse the gallery and rebuild threads for ideas.

  7. #17

    Split Shift Part 2 (Back)

    Dan, I'm with you... I did just that, right about the same time that I did the split-shift mod. I'll post some pics.

    Now, on to the back half of the split shift set up. First you have to decide where and how you are going to install your new inside (driver's side) support for the round bar running parallel across front of the T20. As you can see here, I chose to go down to the bottom of the transmission mount box, using the leading edge of the vertical portion to strengthen the support. There are no doubt, several ways of doing this, just make sure that your T20 U channels can move freely, without interference. Now, its just a question of cutting the round bar where you know you still a bit of bar sticking through, once you thread it through your support (you are going to weld a heavy washer as retainer on the end of this numb). Cut the other side of the bar any place after its stock retention washer. Drill your carrier hole to match the size of the round bar so that it turns freely, but has no additional room. Thread the round bar through your drilled support hole, and then weld your support to your chosen point of attachment.


    At this point, move to the passenger side. You are going to make an inverted "U" off of the top of the stock round bar support, that will extend outward and then come down to carry and support the very end of the round bar. Find some heavy, I think I used 1/8th in flat bar steel and measure a piece that will extend outward until it well clears the shift arm. Cut that piece to size and then weld in place.
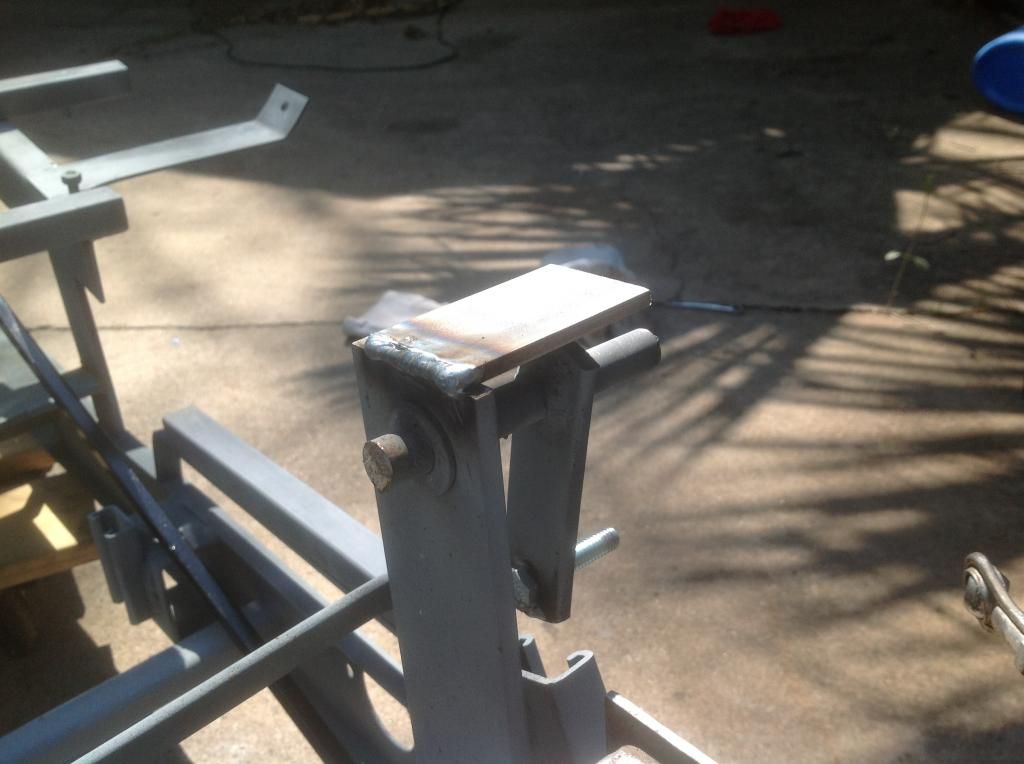

    From there, you take your flat bar stock and measure a piece that will drop down forming the other leg of the inverted "U" far enough to carry the round par once it's drilled out. Cut that piece, drill it out, thread it on the bar and then weld up. Now would also be a good time to cut the weld on the shift arm bolt and replace the bolt with a longer one, as the bolt will now be carrying the width of two heim joints instead of one. It should all look something like this...
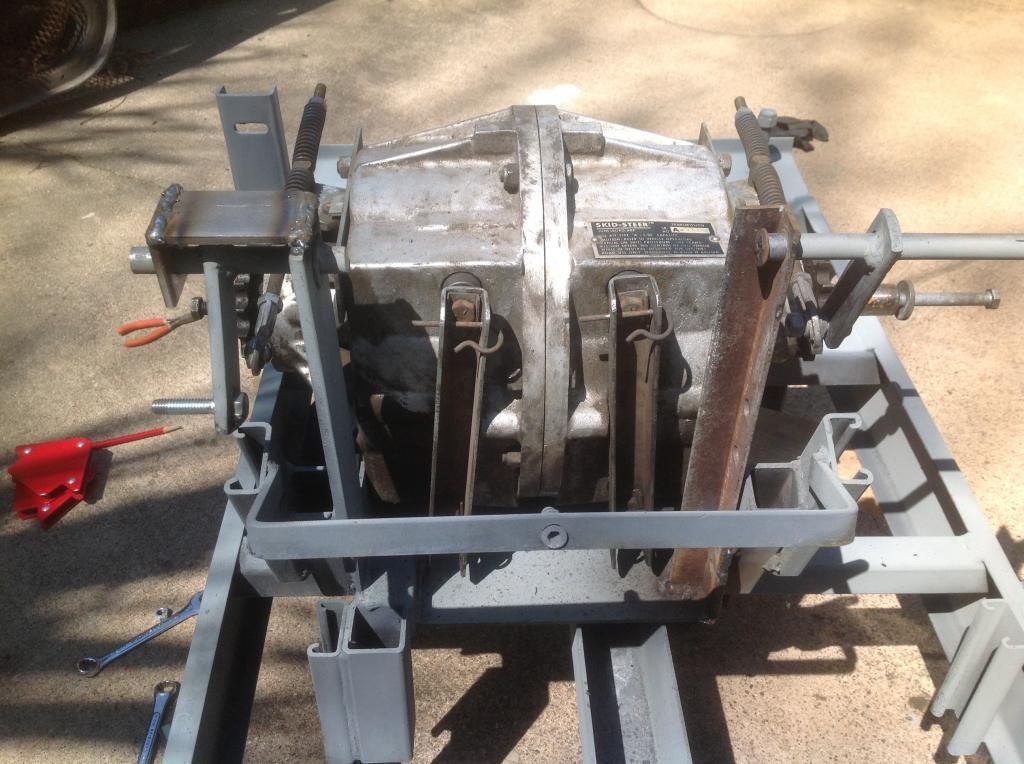
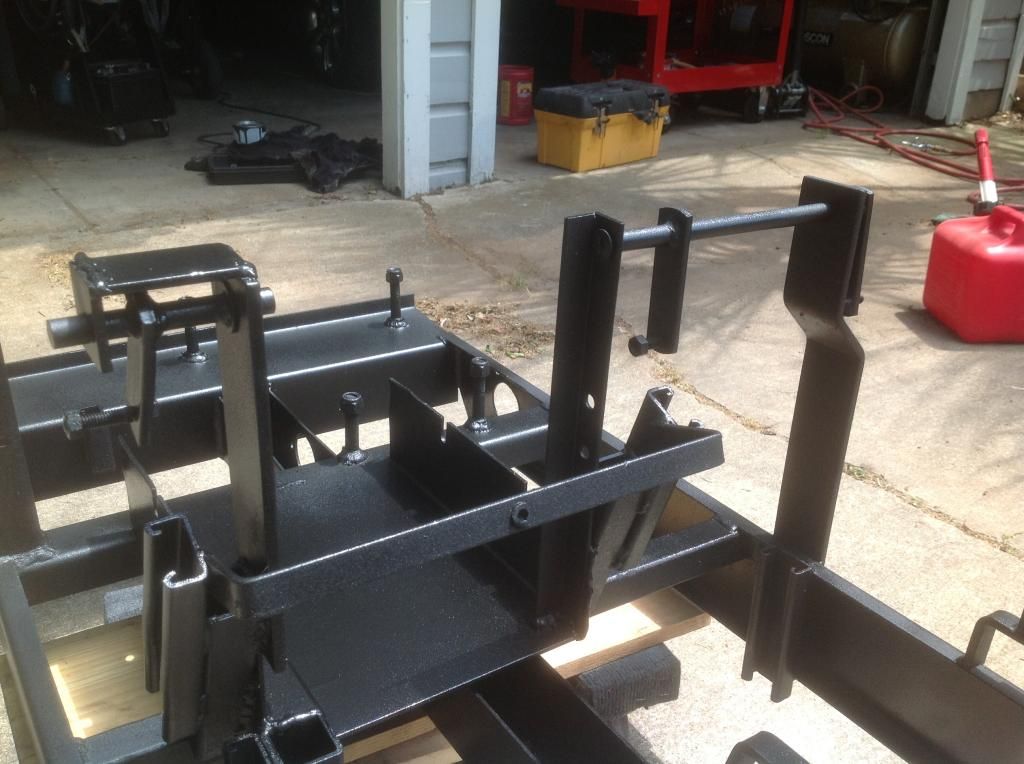
  8. #18
    Freaking awesome! Love it!

  9. #19

    T20 Mount Reinforcement

    This is how I braced my T20 to withstand the greater twist factor associated with the split shift. Nothing to fancy, just 1/8" flat bar with notches and holes to match up with the stock mounting studs, and another notch to clear the shifter ears.
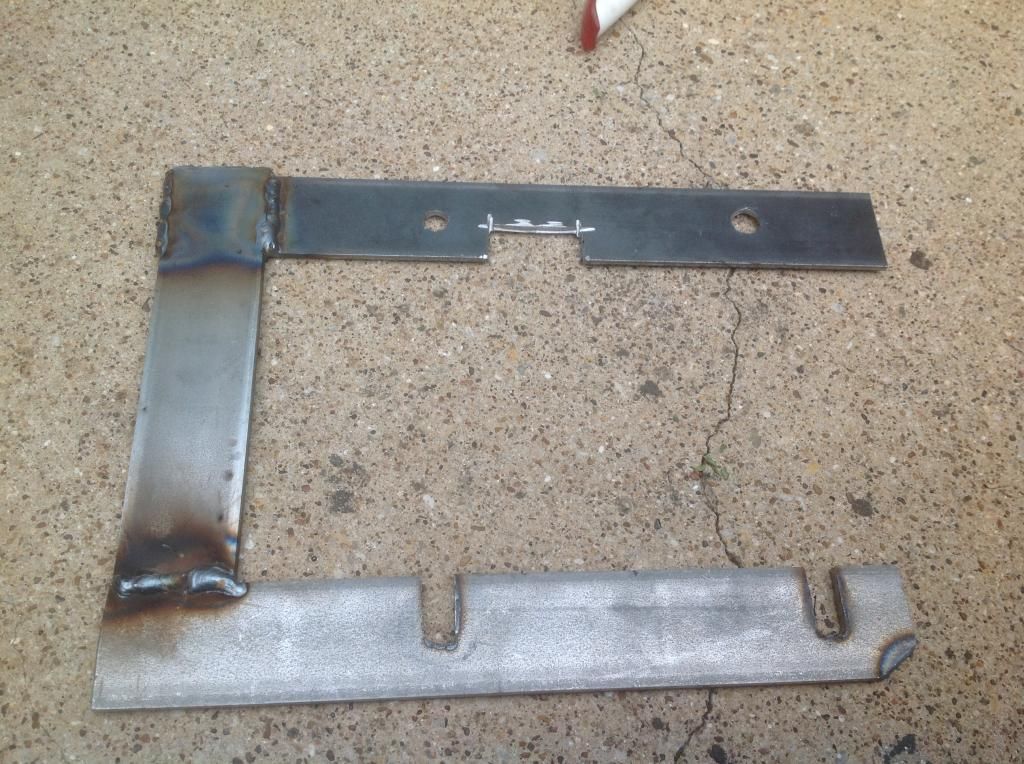
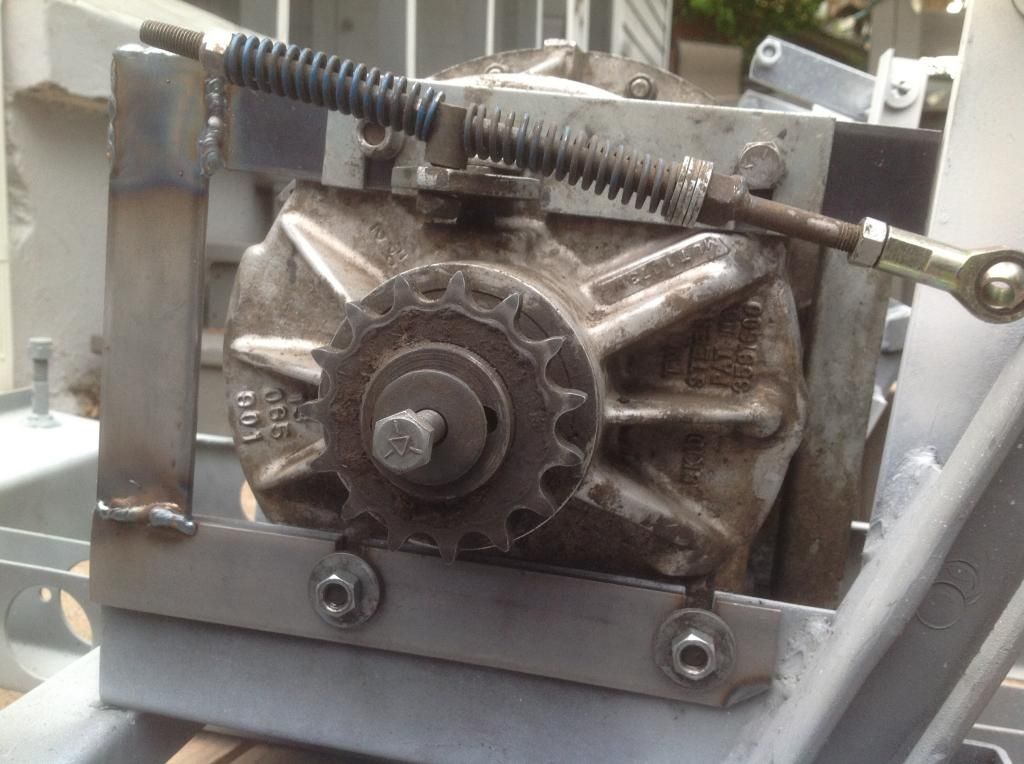
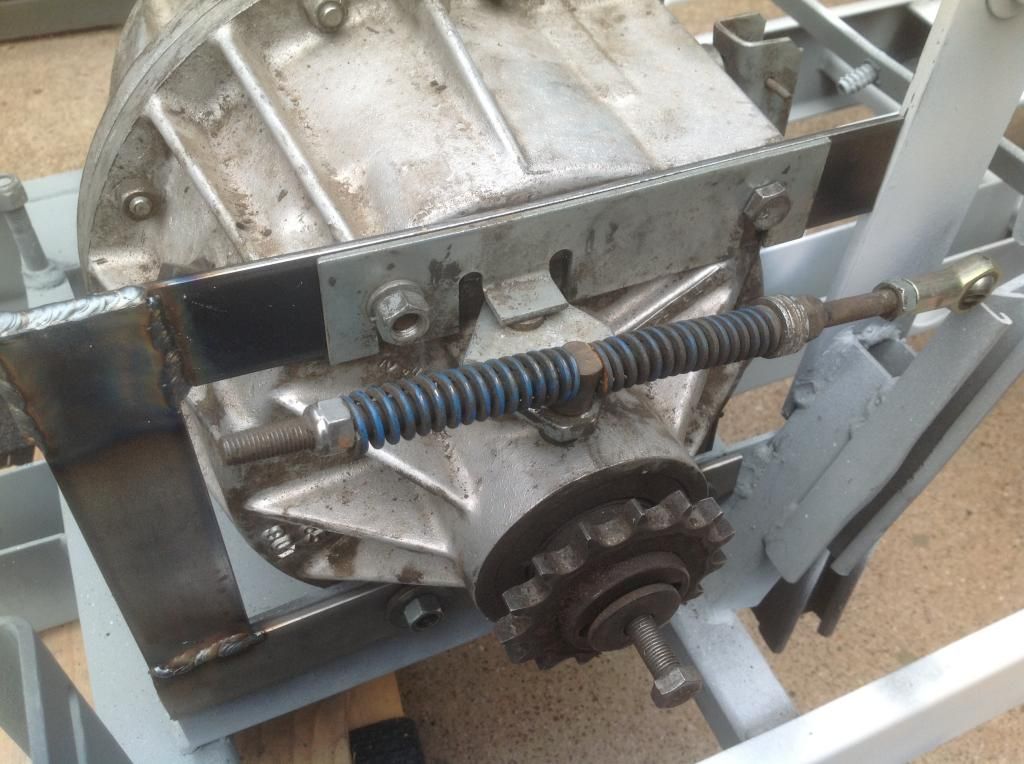


    Painted
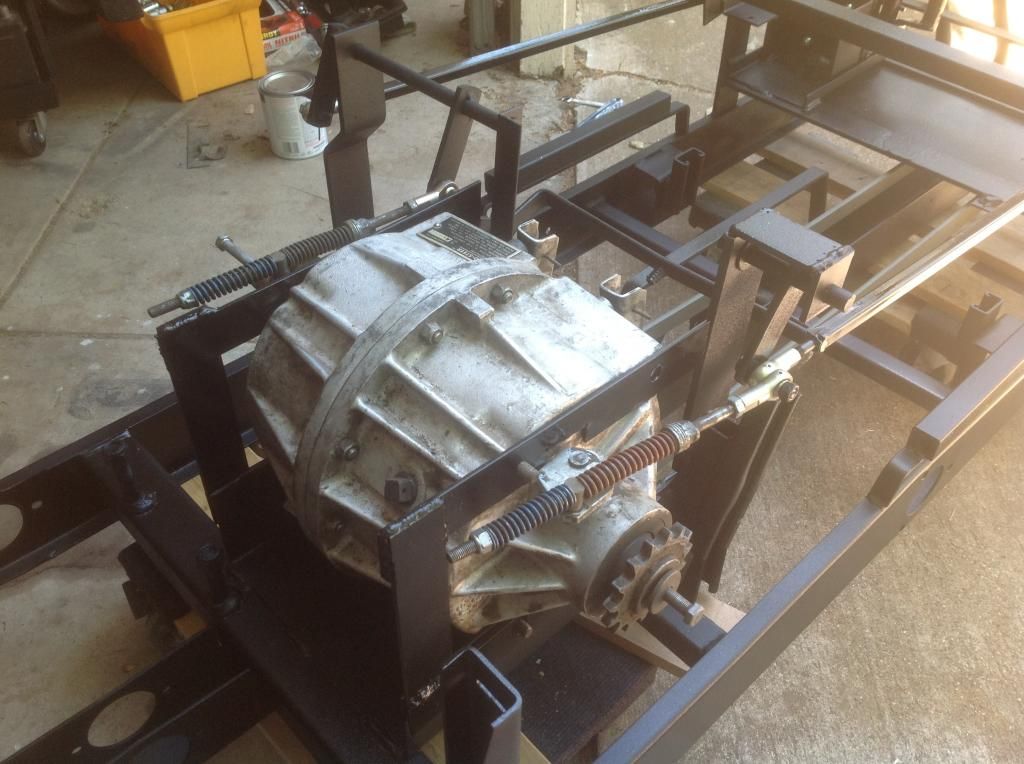
  10. #20
    Join Date
    Aug 2008
    Location
    Okanagan Similkameen BC, Canada
    Posts
    687
    Damn fine work...love it..keep it coming and thanks for sharing...
    MUSCATEER 6x6
    Kubota 14hp 2cyl diesel engine, Hagen/Rooter transmission Comet 780 Drive/770 Driven 22x12x8 Bearclaw tyres
    Soon to add on a ... RHB31 Turbo..guess that would make it a
    MUSCA TUR BOTA then eh?
    94 F350 4x4 7.3 IDI ZF 5sp
    90 Bronco..awaiting a rebuild like no other = Tons and turbo diesel

    Okanagan Similkameen BC Canada
    Al "Camo pants"

+ Reply to Thread

Tags for this Thread

Posting Permissions

  • You may not post new threads
  • You may not post replies
  • You may not post attachments
  • You may not edit your posts