Announcement

Collapse
No announcement yet.

Sealing the Max IV with synthetic bearings

Collapse
X
 
  • Filter
  • Time
  • Show
Clear All
new posts

  • Sealing the Max IV with synthetic bearings

    I started going through the 2007 Max to try and make it as water tight and dependable as I can. I removed the frame just to make sure there were no cracks and make sure it wasn't bent. It looks good, no rust and straight. I did find a spot where the chain rubbed on the bottom of the tub, it's no through the hull but has to be close! What would be the best way to strengthen it up? Try and weld it or rivet a patch over it or both?


    When I disabled it I took pics of the axles so I could make sure it went back the same way.
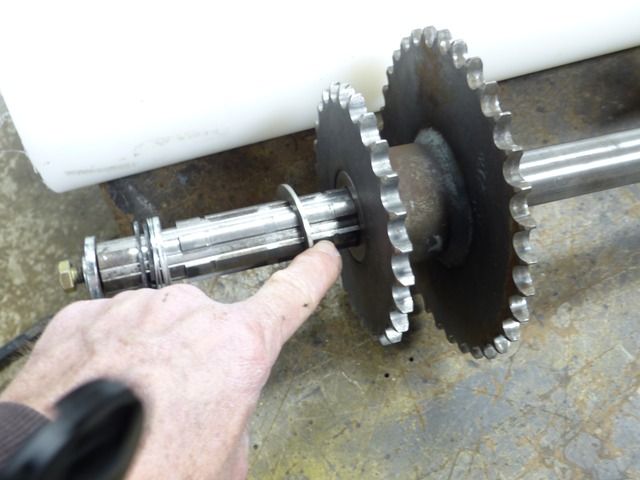
    Well not sure what happened to the pics on the camera but there not there! The only thing i'm not sure on is the washer that goes next to the gear. I think the front and middle axle has the washer to the outside of the gear and the rear is on the inside. I've looked at as many pics by searching and have not found any parts manual for the newer splined axle.


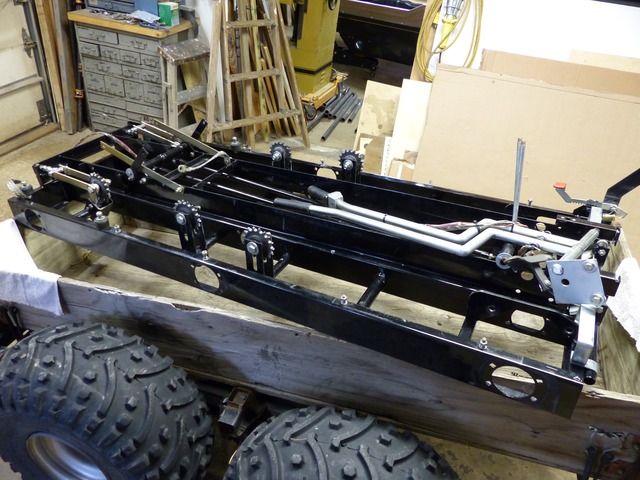
    Need to get the frame back in so I can start making the UHMW extensions.

  • #2
    Line up the rear sprocket to the trans sprocket with a straight edge. That will determine where the washers go. Then work your way forward with a straight edge.
    What it lacks in ground clearance it makes up for with traction.

    Comment


    • #3
      exactly what tbone says, that worked good for me. i also kept a tight string on the outside of the wheel hubs as a guide to keep things straight...(my axles are funky, PO replaced one or two)

      Comment


      • #4
        For the gouge in the tub, you don't have to use a plastic welder. If you have one, great but if not, just heat up some HDPE and let it drip into the gouge. You can heat it with a propane torch or lighter and let it slowly drip in or you can put a small piece in a spoon and get it good an hot and then fill the gouge in.

        Comment


        • #5
          I've found a piece of HDPE cut into small slithers, and placed in a serving spoon, heated with a propane torch, then applied on with a putty knife, will more than do the trick for a small gash like in the above photos.

          Dang, I see Mike beat me to the post.

          Comment


          • #6
            Thanks for the quick reply's. That makes sense about the washers, I will do that.
            The patch sound easier than I had thought. Thanks for the info again!

            One more thing, on the inner axle bearing there was a gasket in-between the 2 flanges, should I reuse it or just use silicon?

            Comment


            • #7
              If it's good you can reuse it. If not any gasket sealer or silicone will work.
              What it lacks in ground clearance it makes up for with traction.

              Comment


              • #8
                Thanks , gaskets are in great shape. I will just reuse them.

                Comment


                • #9
                  Still waiting for new bearings and axle seals from Buffalo Bearing. Hopefully by the end of this week.
                  When I removed the axles from the tub, I noticed on a couple of them the bearings were turning in the flange.
                  Thats where the grease went, not into the bearing. I would think it would leak like sieve!
                  I'm not sure this was the right thing to do, but it made sense to me. I chucked up a piece of stainless in the lathe
                  and turned it down with a taper to fit over the outside of the flange. Lubed it with some high pressure grease and
                  put it in the press. The bearing fits tight now.


                  Comment


                  • #10
                    This is what I had in mind for the synthetic bearings. I still wanted to use the 72mm bearing at the tub. The UHMW is snug on the shaft and will have a triple sealed
                    axle seal at the end, should be water tight. The new bearings and seals are on the way. I had to order grade 5 carriage bolts, all the hardware stores only had grade
                    307 A. I haven't found the 3M strip seal local, guess I will have to order that also.

                    Comment


                    • #11
                      What's going to hold the synth?
                      sigpic

                      My new beer holder spilled some on the trails - in it's hair and down it's throat.
                      Joe Camel never does that.

                      Advice is free, it's the application that costs.

                      Comment


                      • #12
                        It will be held with the carriage bolts. The UHMW is not finished yet, I still need to cut the seal in and then drill the bolt holes.
                        I don't have a large enough chuck in my lathe to get a good hold on the UHMW so i've been using the rotary table in the mill.
                        I want to finish the cuts for the seals before I move the bed to drill the holes.

                        Comment


                        • #13
                          Trying to build a better mousetrap while waiting for parts. When setting the chain tension it sure helped to have an extra hand.
                          1 on the 2x2 pushing down on the idler and the other on the 3/4" wrench to tighten the bolt. You had to have a wrench on the head of the bolt
                          or it would just turn.
                          I cut a piece of 1/8" strap and tacked it to the washer than tacked the head of the bolt to the washer. It slides in the slot and keeps the bolt from turning so you can snug it up without have another wrench on the head of the bolt.


                          Comment


                          • #14
                            Good idea.
                            What it lacks in ground clearance it makes up for with traction.

                            Comment


                            • #15
                              Thanks tbone9
                              The bearings and seals showed up so I finished turning the UHMW for seal. The carriage bolts will be here today.
                              Drilled the 3/8" bolt holes and checked for fit, nice and tight. This is the inside of the cage that will bolt to the outside bearing flange.
                              I won't be using the 3/8" lock washer so I cut a pocket with a 5/8" forstner bit then used the 3/8" bit for the holes. The
                              5/8" hole fits snug around the nut to keep it from backing off the flange. Confused yet?

                              Comment

                              Working...
                              X